
🔩 The Five-Minute Step Everyone Skips Right Before It Matters
You just swapped wheels, rotated tires, or threw on a fresh set of coilovers. The hard part's done. You're tired, your hands are black, and there's one thing left between you and closing the hood: putting the wheels back on and tightening the lug nuts.
Here's the uncomfortable truth. This is the single step in home car maintenance most likely to actually hurt someone, and it's the one people rush the hardest. Not the alignment, not the brake bleed, not the coilover height. The lug nuts. Warped rotors, stress-cracked wheels, snapped studs, and in the worst cases wheels that separate from the car at speed all trace back to this exact five-minute job being done wrong.
None of this requires expensive tools or a shop lift. It requires a torque wrench, a pattern, and about ninety seconds of patience you probably don't feel like spending. This guide walks through exactly how to do it, why the "good enough" method eventually bites people, and what changes once aftermarket wheels and spacers enter the picture.
⚙️ Why "Snug It Down Until It Stops" Isn't Good Enough
Every lug nut has a manufacturer torque spec, usually somewhere between 80 and 140 ft-lbs depending on the car, measured in foot-pounds. That number isn't arbitrary. It's calculated to clamp the wheel against the hub with exactly enough force to keep it seated through braking, cornering, and thermal expansion, without stretching the stud past its yield point.
Go under that number and the wheel can work itself loose over time, especially on a car that sees track days, spirited driving, or rough roads. Vibration is relentless, and an under-torqued lug nut has nothing holding it in place once it starts to back off.
Go over it, which is the far more common mistake, and you get a different set of problems:
- Warped brake rotors from uneven clamping force pulling the hub out of true, which shows up later as a pulsing brake pedal that has nothing to do with your actual brakes
- Stretched or snapped wheel studs, which is exactly as bad as it sounds and usually reveals itself at the worst possible time
- Stress cracks in the wheel itself, especially on lighter aftermarket wheels that weren't designed to absorb an impact gun cranked to max
- Cross-threaded or galled threads that make the next removal a nightmare, sometimes requiring the stud to be drilled out entirely
The person who "just really wants it tight" is doing more damage than the person who slightly under-torques. Overtightening feels safe. It isn't.
🛠️ The Tools That Actually Matter
You need three things, and none of them are exotic.
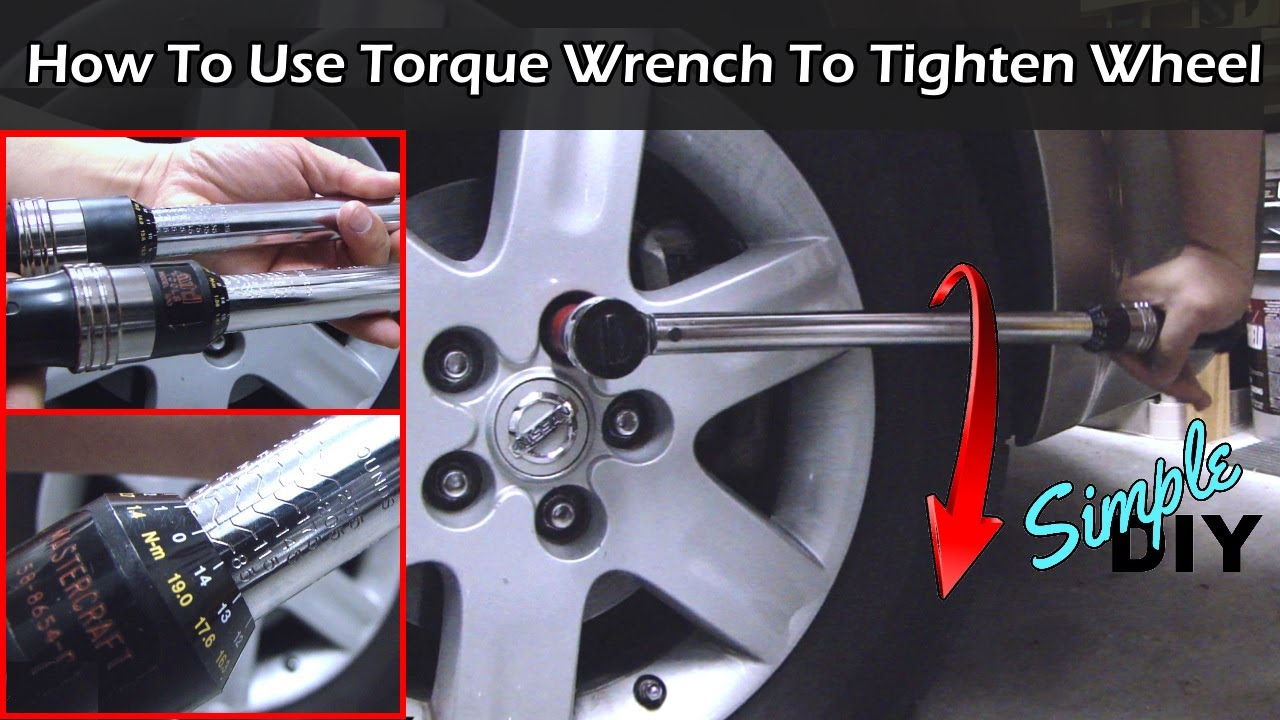
- A torque wrench rated for the range your car needs. A clicker-style wrench in the 10-150 ft-lb range covers the vast majority of passenger cars and light trucks. Beam-style wrenches work too and never need calibration, they're just slower to read precisely.
- The correct socket size for your lug nuts, ideally a thin-wall socket if you're running aftermarket wheels with lug nuts that sit deep in the wheel's lug seat, which is extremely common on lightweight or aggressive-offset wheels.
- Your car's actual torque spec, from the owner's manual, the door jamb sticker, or a quick search of your specific year, make, and model. Don't guess, and don't use a number you remember from a different car. Specs vary more than people assume, sometimes by 30+ ft-lbs between vehicles that look similar on paper.
What you don't need: an impact gun set to max and a prayer. Impact guns are great for breaking nuts loose and running them up to snug. They are a terrible tool for final tightening because there's no reliable way to know how much torque you actually applied. Run them up close, then finish every single nut with a torque wrench. Every time. No exceptions for "it's probably fine."
⭐ The Star Pattern Isn't Optional
Tighten lug nuts in the order they sit around the wheel, going nut to adjacent nut, and you'll pull the wheel slightly off-center against the hub. Do it enough times and you'll warp a rotor without ever touching the brakes directly.
The fix is the star pattern, sometimes called a criss-cross pattern: tighten the nut closest to you, then skip to the one roughly opposite it, then the next closest, then its opposite, working your way around in a star shape rather than a circle. On a 5-lug wheel that looks like 1, 3, 5, 2, 4. On a 4-lug it's 1, 3, 2, 4.
This pulls the wheel evenly onto the hub from all sides instead of walking it off-center one bolt at a time. It matters more than people think, and it costs you zero extra time once you know the sequence.
Do two full passes. First pass, snug everything by hand or with the impact gun set light, in the star pattern. Second pass, torque wrench, same star pattern, to spec. A third light pass to confirm nothing crept is never a bad idea, especially on a wheel you just pulled off for the first time.
🔧 What Changes With Aftermarket Wheels and Spacers
Bolt-on aftermarket wheels and spacers don't just change the look of your car, they change the hardware math too.
- Lug nut length and seat type matter more than people expect. Aftermarket wheels almost always need aftermarket lug nuts with the correct seat, conical, ball, or flat depending on the wheel, and the correct thread length to fully engage the stud without bottoming out in the lug seat before the wheel actually clamps down. A lug nut that bottoms out feels tight on the wrench while doing almost nothing to hold the wheel on. This is a real and common failure mode, not a rare edge case.
- Wheel spacers add a second clamping interface, meaning both the spacer-to-hub bolts and the wheel-to-spacer lug nuts need to be torqued correctly and independently. Skipping the torque check on either half defeats the whole point of doing this correctly in the first place. If you're running spacers, check out our breakdown of why wheel spacers are car culture's most debated gamble for the fitment side of this equation.
- Extended studs, common on cars running spacers or aggressive offset wheels, still have their own torque spec from the stud manufacturer, which can differ from your factory spec. Don't assume the number on your door jamb still applies once you've changed the hardware it was written for.
If you're still dialing in fitment before you get to any of this, our guide on how to calculate wheel fitment so you don't rub is the step that comes before torque specs even become relevant.
⏱️ The Re-Torque Everyone Forgets
New wheels, new lug nuts, or a wheel that's just come off and gone back on need a re-torque check after the first 50-100 miles of driving. This isn't superstition. New contact surfaces between the wheel, the hub, and the lug nuts settle slightly under real driving load, and that settling can leave a nut that read perfect torque on install slightly loose an hour of highway driving later.
This is doubly true after a track day. The heat cycling a wheel goes through on track, combined with the actual cornering and braking loads, settles hardware even more than street driving does. Anyone who's spent a season doing track days has heard the same advice from every corner worker and tech inspector: check your lug torque before you leave, not after something starts to feel off in turn three.
Set a reminder. It takes five minutes and it's the cheapest insurance you'll ever buy on a build.
Spota tip: if you're tracking maintenance in your Garage, log torque checks alongside your other mod and service history. It turns "I think I checked that" into an actual record you can look back on, especially useful before a big drive or a track day where you want to know exactly when hardware was last verified.
❌ The Mistakes That Actually Cause Problems
- Using an impact gun for final tightening instead of just breaking loose and snugging, then finishing by hand torque
- Skipping the star pattern, especially on wider or heavier wheels where uneven clamping shows up faster
- Guessing at spec instead of pulling the actual number for your specific car
- Reusing damaged or corroded lug nuts that no longer seat cleanly, which throws off torque readings even when the wrench reads correctly
- Not re-torquing after the first drive on new wheels, new hardware, or a wheel that just came off
- Anti-seize on threads without adjusting torque down, since lubricated threads clamp harder at the same torque reading than dry ones, which can actually over-clamp the joint if you don't account for it
- Ignoring a lug nut that spins strangely easy or hard compared to the others on the same wheel, which is almost always a sign of thread damage worth investigating before you trust that wheel at speed
None of these take real skill to avoid. They take patience for a job that feels like it should be over already.
🏁 Five Minutes Now, or a Bad Story Later
Every car person has a lug nut horror story, either their own or a friend's: the wheel that started wobbling on the highway, the rotor that warped two weeks after a "quick" wheel swap, the stud that snapped off in a gas station parking lot two states from home. Almost every one of those stories starts the same way, with someone deciding the torque wrench step could wait.
It can't. Get the right spec, use the star pattern, finish with a torque wrench every time, and re-check after the first drive on anything new. It's the least exciting five minutes of any wheel job and the one that actually keeps you safe doing everything else you love about this hobby.
For more build-day fundamentals, check out the rest of our guides in how-tos.